

Quickly editing videos with iMovie is an easy and user-friendly way to create professional-looking videos efficiently. Whether you’re making a short film, an educational video, or just putting together a few clips for fun, the basic steps are similar.
In this post, we’ll go through each step in detail to help you edit videos with iMovie like a pro.
Why Do You Need iMovie and What Makes It The Best Choice of Yours?
If you’ve got an iPhone, you’ve already got a great camera for shooting videos.
| You can also check here: How to use iPhone Camera for shooting professional videos |
But when it comes to editing, you might be wondering what software to use.
Well, let me tell you – iMovie is where it’s at! It’s designed specifically for Mac and iOS devices, so you know it’s going to work seamlessly with your iPhone. Plus, it’s easy to use and has all the features you need to create amazing videos.
So why not give it a try and start sharing your awesome content with the world?
Follow these steps to make your professional video in a few clicks :))
6 Simple Steps to Make Appealing Videos with iMovie
Step 1: Import Media Files
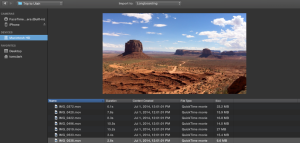
The first step is to import the media files you want to use in your video. iMovie allows you to upload media files from your device or import and download media files from online sources like YouTube or Vimeo.
Way 1 – Uploading media files from your device
To upload media files from your device, open iMovie, select “Import Media,” and choose the media files you want to use. You can import photos, videos, or audio files.
Way 2 – Importing/Downloading media files from online sources
To import or download media files from online sources, you’ll need to find the URL for the media file you want to use. Copy the URL and paste it into iMovie’s “Import Media” option.
iMovie will download the file and add it to your library.
Step 2: Organizing Your Clips
Organizing your clips is essential to make the editing process more manageable. You can create bins to store your clips and arrange them in the timeline according to your preferred order.
Creating bins to store your clips:
- To create bins, click on the “New Event” button in the upper-left corner of the iMovie window.
- Name the event and select the clips you want to include in the bin.
- Drag and drop the clips into the event.
Arranging clips in the timeline:
- To arrange clips in the timeline, drag and drop them from the event browser into the timeline.
- You can adjust the order of the clips by dragging them left or right.
Step 3: Editing Your Clips
Once you’ve organized your clips in the timeline, it’s time to start editing them to create a cohesive and polished video. Here are some of the ways you can edit your clips in iMovie:
Trim and Cut out Unwanted Footage:
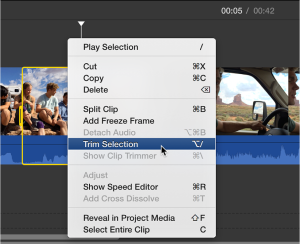
To trim a clip, simply select it in the timeline and then click and drag the yellow handle on either end of the clip to shorten or lengthen it.
You can also split a clip into two separate clips by placing the playhead where you want to make the cut and then pressing Command+B.
This will split the clip into two parts, which you can then edit separately.
| Pro Tip: To remove unwanted footage from a clip, use the “Blade” tool to make precise cuts at the beginning and end of the unwanted section. Then, select the section you want to remove and press the Delete key on your keyboard. |
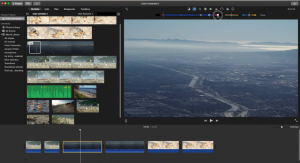
Add Transitions and Effects to Enhance the Visuals:

Transitions are visual effects that appear between two clips, such as a fade or dissolve. To add a transition, simply drag and drop it between two clips in the timeline.
iMovie also has a variety of visual effects that you can add to your clips, such as filters, color adjustments, and picture-in-picture.
To add an effect, select the clip you want to apply it to and then click on the “Effects” button in the top right corner of the iMovie window.
Step 4: Adjusting the Audio Levels on Each Clip
It’s important to ensure that your video’s audio is clear and consistent throughout. To adjust the audio levels on a clip, select the clip in the timeline and then click on the “Audio” button in the top left corner of the iMovie window.

From here, you can adjust the volume of the clip, as well as apply audio effects such as equalization and noise reduction.
Step 5: Applying color corrections
To make sure your video looks its best, you may want to apply some color corrections. This is especially useful if you shot your footage in different lighting conditions or if the colors are looking a bit dull.
To do this, simply select the clip you want to edit and click on the “Color Correction” button.
From there, you can use the sliders to adjust the brightness, contrast, and saturation levels until you’re happy with the result.
Adding titles and credits
If you want to add some text to your video, like titles or credits, it’s easy to do with iMovie.
Just click on the “Titles” button and choose the title style you want to use.
You can customize the text and font style to your liking and then drag and drop the title onto the timeline.
Step 6: Exporting Your Final Video
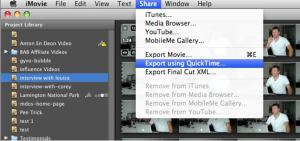
Once you’re happy with your video and have added all the finishing touches, it’s time to export it so you can share it with the world.
Before exporting, you need to prepare for export settings, like setting the resolution, frame rate, and quality.
After that, you can render the video and save it in the desired format. Then, it’s ready to be shared with your friends, family, or audience!
FAQs – More Questions About Quickly Editing Videos
Q. How can I quickly edit videos in iMovie on my Mac?
Editing videos in iMovie on your Mac can be a lot of fun, and there are many ways to make the process go quicker. One tip is to organize your footage before importing it into iMovie. Another is to use iMovie’s built-in templates and themes to help speed things up
Q. What’s the best way to trim videos in iMovie on my iPad?
Trimming videos in iMovie on your iPad is easy and can be done quickly. The precision editor is a great tool to help you adjust the start and end points of a clip with precision. Plus, you can always undo any changes you don’t like.
Q. Is there an iMovie video editor for Windows 10?
Unfortunately, iMovie is not available for Windows 10. However, there are many other great video editing software options available for Windows, such as Adobe Premiere and Filmora.
Q. What’s the quickest way to cut clips in iMovie on my iPhone?
Cutting clips in iMovie on your iPhone is a breeze. You can simply use the “blade” tool to split your video into smaller sections, and then delete any unwanted sections.
Q. Can I edit videos shot on my iPhone using iMovie on my iPad?
You can absolutely use iMovie on your iPad to edit videos shot on your iPhone. Just transfer the footage to your iPad and import it into iMovie. From there, you can get to work editing your video.
Q. What advanced editing techniques can I use in iMovie on Mac?
If you’re looking to take your iMovie skills to the next level, there are many advanced editing techniques you can try. For example, you can use green screen effects, slow motion, or create a split-screen effect. The possibilities are endless!
Final Words!
Overall, iMovie offers a variety of tools and features to help you edit your video clips with ease and precision. By following the above-mentioned steps in the guide, you can create a polished and professional-looking video that tells your story effectively. We hope this guide will help you if you’re starting off with iMovie to edit videos to another level!


